Welcome to V-Drive California, a site to share my 1975 Sanger Flatbottom Bubbledeck Family Ski V-drive information with others that love the water and hot boats

Wednesday, October 31, 2012

Build Your Own Dolly

I needed to get the boat off the trailer to make some trailer repairs and do some bottom work on the boat. So I had to put together a dolly that would make it easy to get the boat onto and then make it easy to move around the garage to work on also. The following is a step by step "how-to" put a dolly together. My boat is a 18'-10" Sanger Flat bottom, and the basic dimensions (41" wide x 11'-0" length) of the dolly are based on where the bunks are setup under the boat. These dimensions I got from the trailer setup.

Here is the Material List:

All lumber is type Douglas Fir #2 or better
                MATERIAL                      USE FOR:
                2 each - 2” x 6” x 12’       (Bunks)
                3 each - 2” x 4” x 12’       
                (Longitudinal base frame members, bunk risers)
                1 each - 2” x 4” x 10’       (Center cross members)
                1 each - 2” x 4” x 8’         (End cross members)
                3 each – Plywood Panels ¾”x 24” x 24” (Gussets)
                1 box - 3” Gold Screws
                1 box - 2” Gold Screws
                16 - 3/8-16 x 1 1/2” Hex Head Bolts
                16 - 3/8-16 Hex Nuts
                32 - 3/8 Flat Washers
                4 each - 5”x2” Swivel Castors Harbor Freight #38711


Here is the Cut List:

Bunks - Cut 2x6x12 down to 11’-0”          2 each
Bunk Risers-Cut 1 of the 2x4x12’ into 12” lengths   10 each
Base Frame Longitudinals – Cut 2 of the 2x4x12 down to 10’-9” 
Base Frame Center Cross Members – Cut down to 38”     3 each
Base Frame End Cross Members –  Cut down to 41”        2 each
Base Frame Gussets – Cut each 24”panel diagonally in half    6 each


 Set up all materials – Check for proper cuts, inventory parts.

                There are 4 parts in this project:     1) Base Frame 2) Bunk Risers 3) Castors 4) Bunks

Base Frame
1) Setup base longitudinal members on floor
2) Layout measurements for center cross members. From rear measure 31 ½”, 63 ¾”, 96”, and mark with a framing angle. This will be the face mark for the cross member from the rear. Check for equal distances between front and rear. Adjust if necessary.
3) Fit the end cross members into place and pre-drill for 3” screws
4) Fit the center cross members into place and pre-drill for 3” screws
5) Assemble the end and center cross members with 3” screws
6) Flip the entire frame over
7) Fit the gussets to all corners and center cross member and pre-drill for 2” screws
8) Assemble the gussets with 2” screws
9) Flip the entire frame over again


Bunk Risers 
Note: If your hull design requires any of the bunk risers to have an angle cut complete these cuts before the final assembly of the bunk risers onto the base frame if you have a table saw or compound miter saw. If not then mount them first and cut the angle with a skil saw.

1) Assemble the 4 corner pieces with 2” screws only before mounting to the frame
2) Fit the corner pieces into place with the 5” side facing to the short length of the frame
3) Pre-drill thru the base frame into each of the riser members. Short and long length sides
4) Fit the center risers to the center cross member and pre-drill thru the riser
5) Assemble all risers to the base frame with 3” screws


Castors
1) Using a castor, place on the inside the corner riser and mark all 4 mounting holes. Do this at all 4 corners noting the direction of the long side of the castor base plate
2) Place a support under the frame and drill holes with clearance drill size for a 3/8” bolt
3) Flip the frame over and let it stand on the risers
4) Mount the 4 castors using the 3/8-16 hex hardware and flat washers
5) Tighten until set into wood member
6) Flip the frame back over to the upright side


Bunks
1) Set the 2 x 6 bunks onto risers
2) Align the bunk flush with the outside base frame and end of base frame
3) Layout the risers on top of the bunk to get a screw pattern
4) Pre-drill each of the riser locations for 3” screws
5) Mount bunks with 3” screws


Monday, March 12, 2012

FLYING SANGER!

Got a nice shot during our New Years Event out at Camp Far West of the Sanger in full on bull riding mode!


And some others of my favorites


All the Bling Added

Since the motor resurrection was complete, I had to finalized the rest of the boat's mechanical, electrical, fuel and water systems. I added all new Autometer mechanical gauges in the dash (Fuel PSI, Oil PSI, Water Temp) with red billet bezels and a new tach with recall. The electrical wiring was renewed through the entire boat with a fuse panel under the dash and a new Optima battery with a billet aluminum battery box with new heavy locomotive cables to a new battery cut-out switch. Also added a ignition safety switch too just for safety purposes.

I found a deal on a 1" Magnaflow water pump and replaced the old Neovane unit with all new stainless steel water lines installed everywhere. The fuel tanks were leaking so they had to be welded up at the bungs and all new stainless steel fuel lines were then added along with a new pump, filter and fittings.

I finished polishing all the aluminum parts, linkage, intake and anything that wasn't already shiny and added some new chromed fabricated valve covers to top it all off. All of this in preparation for the 2012 Sacramento Autorama Show which we had 18 boats entered. It was a really good showing of boats from all our local owners.


Friday, September 23, 2011

Sanger Resurrection

This boat has been thru many hands and has been left in total disarray of form and function when it first landed in my hands. The list is way too long to list here and would bring most boat people to tears.

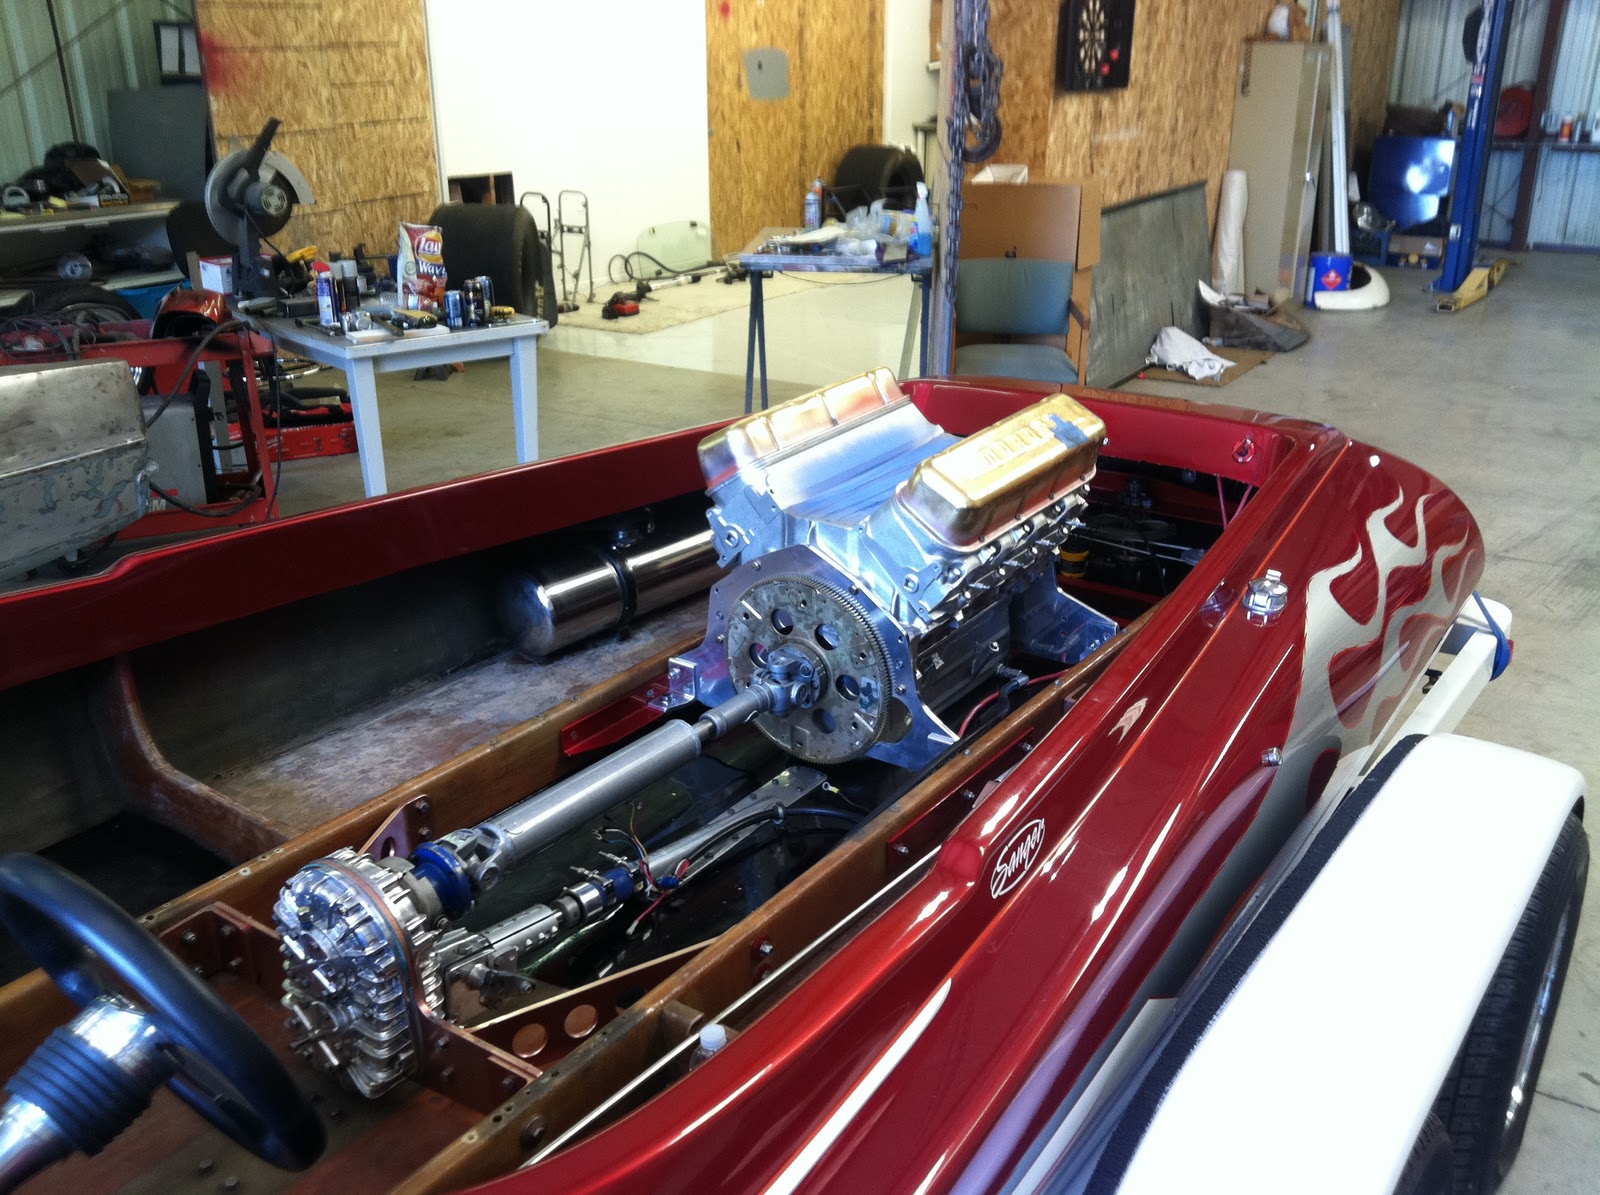
First things first; I had the ultimate pleasure of getting connected with Andy Herbert up near the CFW area and this man got me and this boat back on the right track. Somebody had installed a Powerglide in this boat at some point (and not very well either) and Andy got it all straightened out after adding a new Casale box with a whirlaway all fresh and rebuilt by another great man of many talents; Steve Patterson, all getting rid of the old Algon prop release that had been jammed on so tight we had to cut it off the prop shaft. The motor rails were just about toast and he made some adaptors for them until new ones could be furnished and also re-fabricated the rudder cross brace that had been lagged into the stringer tops. Without the help of these two guys I would have been way up the creek... without the paddle!

And then the old 461 engine finally let go after being swamped and never actually clean out by the prior owner(s), it was time to give this old boat some new lifes blood. I got together with Brian Johnson Racing Engines and he finished a brand new engine for the boat. I decided to go with a 496 cubic inch motor this time mostly because he had one ready to go with a bottom end that was originally planned for a blown injected customer. It has a steel Scat crank, Crower built/balanced rod assemblies and now with JE pistons for a 10.2:1 compression ratio to basically run pump gas. My original 990 rectangular port heads have been completely reworked with new valves, springs, retainers, hardware and put back together with Crane Gold roller rockers and Comp Cams Xtreme pushrods to finish out the valvetrian to the new cam; a Comp Cam solid flat tappet with .629 Intake/.605 Exhaust Lift @ 108 Degree.

New Block, Bottom End Installed
At this point I decided to fabricate everything all new and be done with the inside of the boat. The entire motor rail mounting assemblies had to be remade along with new motor mounting feet all made from T-6061 Aluminum and then polished and some of them powdercoated with an insane candy red color that matches the boat to perfection. The bildge area was all scraped and sanded and a new coat of black Duracoat was layed down. Andy then milled out a strut plate for me and I fabricated some cross bracing and connection plates to bring it all together.
New Motor Rails Installed, Strut Plate, Crossmembers
The powerglide transmission came out and a new driveshaft assembly was completed by Driveline Service of Sacramento. We dropped the motor into place at Scotts shop with the new driveline assembly completed.
Dropped Engine Into Place
I have reused the Edlebrock TR-2X intake with new Holley 850 DP carbs built by Nickerson Marine and the Rewarder twistie headers. Its all fired up through a new MSD 6AL ignition box with a rev limiter this time... I think the old junker engine just couldn't handle the RPM's I was expecting of it. I dont have any doubts this one will do just fine.
Engine together with New Carbs
Engine was all completed and re-fired on September 7 with the builder present to hear his work!
All Fired Up!!!
Shakedown runs at Camp Far West with "The Bandit" along for a ride


All ready for show and GO! - JUST ADD WATER!


Friday, June 10, 2011

Hotboat Lake CFW

One of the nicest NorCal lakes for the Hot-boating crowd has got to be "CFW" or Camp Far West reservoir located near the town of Wheatland, California. Its about an hour north of Sacramento and can be just a serene a place as one can imagine.  But at other times when the hot boats, alcohol burners and the nitro boats show up.... well its just plain good ole fun.

I found a day when there was nobody there and did some test and tune after getting my new carbs on the boat. This is still the old configuration (461 CI engine), but the 660 carbs were junk and just could not be made to work. I got a set of 850 Holleys and put them to work on the boat.


This lake is privately owned and operated and the owners really appreciate the hot boat group and we in turn appreciate them for providing a facility such as this to use at our leisure for much fun.


It has 2 launch facilities, one on the North Shore and one on the South Shore. The South Shore has launching capability from the beach area also when the lake is full. Both places have a store and it has camping facilities with tables provided. The sites will fit motorhomes but they don't have power and water.

This is not a huge lake and thats why it appeals to the hot-boat crowd, theres no 40' cruisers out there churning up the waters, the minimal amount of wake and ski boats that show up stay on the main lake side and there is a cove on the South Shore where most of the hot-boats can play and remain out of peoples way.

Update: The day these photos were taken the original motor died. It was found out that the motor was some rookies try at motor building and 3 rod bearings froze to the crank and spun. Cooked 2 main bearings also. Looks like assembly errors were the cause and possibly me trying to get to 7000 rpm ????  Maybe.

Friday, March 4, 2011

K-Boats at Needles


These are a couple of K-Boats that ran at the Needles Show. The green boat is the K-50 boat which has been totally rebuilt in honor of "Julian". The orange boat is the K-323 of Concept Marine which is a new version of the circle boat racers. The K-Boats are the top class in Circle Boat Racing.

Wednesday, March 2, 2011

Needles California

This is a boaters 'mecca' for hotboats and I had a chance to visit the event this year for the first time and experience all of its grandeur and people.

The people are what makes it the greatest event around because it is put together by people that care; for the boats, the rods and the City of Needles. It is an event organized by the City of Needles and some of their local business people, local schools and social organizations like the "The Elks".

Boat and Rod people come from all over the country to participate. There is a golf event the first day and then a "Parade of POWER" thru the city for the townspeople to come out and greet everyone. This ends the evening with a BBQ at the local city park. There is a show and shine both days of the weekend with food vendors from the local schools that support their local sports. Each day the boats will do speed runs up and down the Colorado river at Jack Smith Park for the spectators to see some thrills.